Diagram 1: Essential Components
of a Porous Load Autoclave
This diagram highlights the key components of a porous load autoclave, such as a vacuum pump, chamber jacket, and steam generator, which are essential for its operation.
This example features an Astell AMA Top-Loading Autoclave. Front-loading versions are also available.
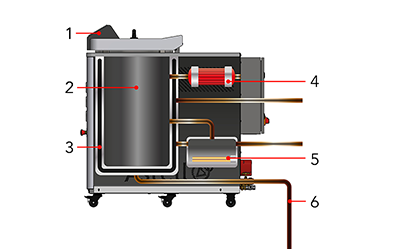
- Control Computer
- Chamber
- Chamber Jacket
- Vacuum Pump
- Steam Generator
- Drain
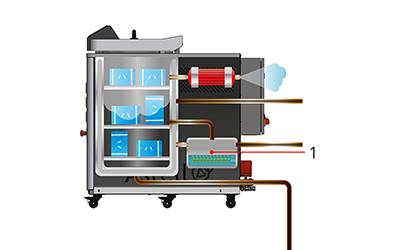
Diagram 2: Stage 1 -
Loading the Autoclave
This diagram illustrates the process of loading an autoclave chamber. Items are placed with adequate spacing to ensure steam can circulate freely for proper sterilization.
After loading, the chamber door is securely shut and locked. The autoclave's steam generator will automatically refill if low on water, ensuring proper operation for the sterilization cycle.
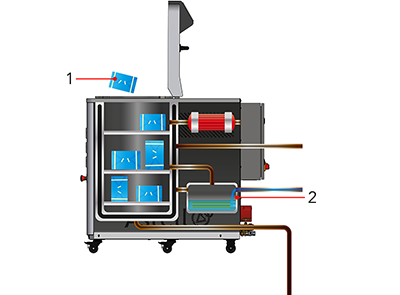
- Wrapped items are loaded into the Chamber
- Steam Generator fills with water if low
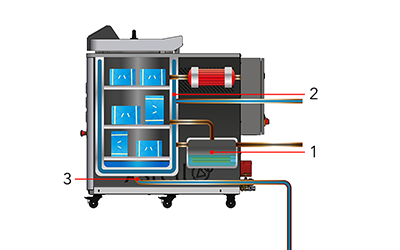
Diagram 3: Stage 2 -
Pre-Vacuuming the Chamber
This diagram shows the pre-vacuuming process in an autoclave. A vacuum pump extracts air from the chamber, lowering the pressure. Trapped air within the items expands under low pressure, facilitating its escape.
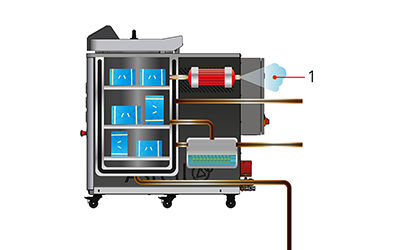
- Air is pulled out of the Chamber by the Vacuum Pump
Diagram 4: Stage 3 -
Fluctuating the Chamber Pressure
This diagram illustrates the process of fluctuating the pressure in an autoclave chamber. Steam enters the chamber, increasing pressure and compressing air pockets. The vacuum pump then reduces the pressure, dislodging trapped air. This cycle is repeated until all air is removed.
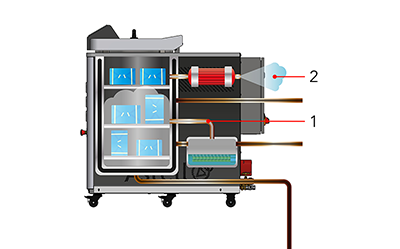
- Pressure in the Chamber is increased by the Steam Generator
- Pressure in the Chamber is reduced by the Vacuum Pump
Diagram 5: Stage 4 -
Sterilization
This diagram depicts the sterilization process in an autoclave. Steam fills the chamber, increasing pressure and temperature. Items are sterilized when exposed to steam at 121°C for a set duration.
The steam generator continuously produces steam, compressing it into the limited space of the chamber. This raises the pressure and temperature as more energy is required to convert water into steam.
When the steam reaches a temperature above 121°C, sterilization begins. Items must remain in this environment for the required time.
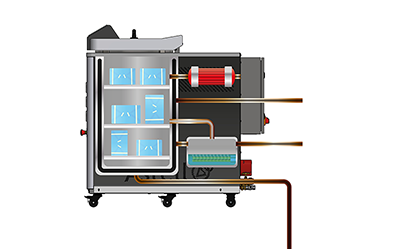
Diagram 6: Stage 5 -
Drying
Steam fills the chamber jacket, keeping the chamber hot without adding moisture. Airborne moisture is extracted by the vacuum pump to dry the load.
After sterilization, the steam valve to the chamber is closed, and a valve to the chamber jacket is opened.
As pressure drops, the temperature at which water evaporates decreases, speeding up the drying process.
- Steam Generator valve to Chamber is shut and Jacket is opened
Diagram 7: Stage 6 -
Cooling
The chamber cools, pressure normalizes, and sterile items are prepared for removal.
Cooling can be accelerated by filling the chamber jacket with cold water. Remaining moisture condenses and is drained away.
Once temperature and pressure match the external environment, the door can be opened safely.
- Valves from Steam Generator are shut
- Valve between water supply and Chamber Jacket is opened
- Valve opens to drain water from the Chamber
Learn more with Astell Articles
With over 140 years of experience in autoclave manufacturing, Astell understands steam sterilization inside and out. Explore expert insights, guides and technical knowledge in the Astell Articles Archive.