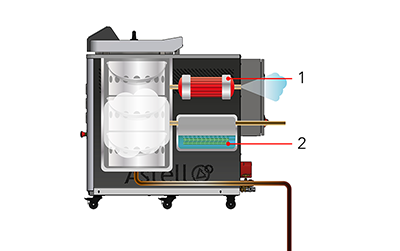
Diagram 1: Essential Components
of a Vacuum Autoclave
This cross-sectional diagram is a simplified example of an AMA vacuum autoclave with a steam generator. Frontloading varieties are also available in the AMB, ASB, and Square Section ranges.
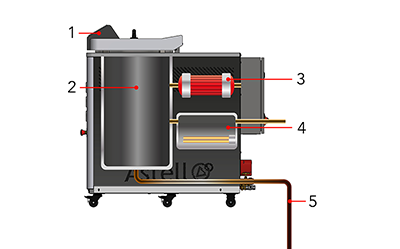
- Control Computer
- Chamber
- Vacuum Pump
- Steam Generator
- Drain
Diagram 2: Stage 1 -
Loading the Autoclave
The chamber door is opened, and items to be sterilized are placed inside the chamber. In this example, the objects being sterilized are contained within Morrison discard containers. When the steam generator is low on water, it will refill itself automatically.
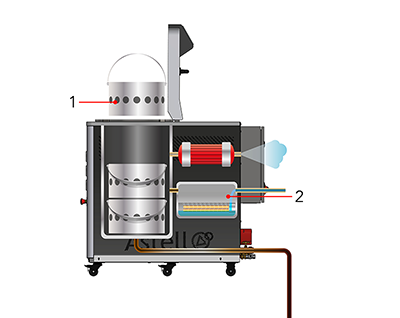
- Morrison Container is lowered into the Chamber
- Steam Generator refills when low
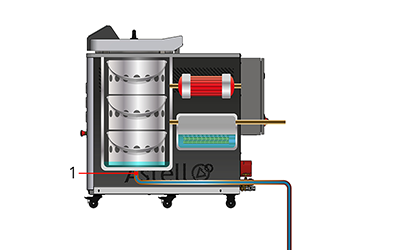
Diagram 3: Stage 2 -
Pre-Vacuuming the Chamber
The vacuum pump extracts air from the chamber, creating lower pressure within the chamber and dislodging some of the air trapped within the items requiring sterilization.
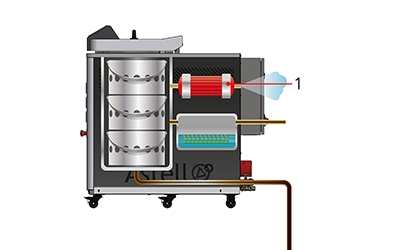
- Vacuum Pump extracts air from the Chamber
Diagram 4: Stage 3 -
Pressurizing with Steam
A valve opens, and steam from the steam generator fills the chamber, increasing the pressure within the chamber and dislodging more of the air trapped within the items in the chamber.
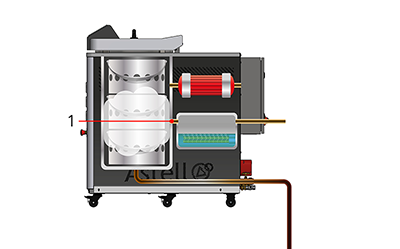
- Valve opens to allow steam into the Chamber
Diagram 5: Stage 4 -
Fluctuating the Pressure
The pressure in the chamber goes through repeated cycles of pressurizing the chamber with steam, then depressurizing with the vacuum. This compresses and expands the air trapped in the chamber, dislodging it from pockets until all air has been replaced by steam.
- Vacuum Pump reduces the pressure in the Chamber
- Steam Generator increases the pressure in the Chamber
Diagram 6: Stage 5 -
Sterilization
The steam generator continues operating, adding more steam to the autoclave chamber. As more steam is added, pressure and temperature rise. Once the chamber reaches 121°C or higher, sterilization of the load begins. The temperature is maintained for a predefined period to ensure complete sterilization.
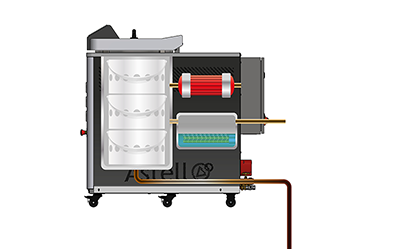
Diagram 7: Stage 6 -
Cooling
Once sterilization has completed, the valve to the steam generator is shut, and the chamber cools. As temperature and pressure drop, steam condenses into water, which collects at the bottom of the chamber. When pressure equalizes, a valve drains the water and the chamber door can be safely opened.
- Valve opens to drain water from the Chamber

Learn more with Astell Articles
With over 140 years of experience in autoclave manufacturing, Astell understands steam sterilization inside and out. Explore expert insights, guides and technical knowledge in the Astell Articles Archive.