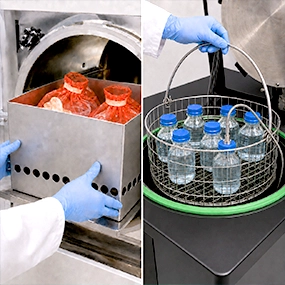
A cycle can finish on schedule and still fail part of the load — for opposite physical reasons in a bottle of media and a bag of waste. Here's what's actually happening inside the chamber in each case, and how to load for it.
Astell has written elsewhere about why liquid cycles and discard cycles need to be specified and thought about differently — see Getting Liquid Cycles Right and The Other Half of the Job for that side of the story. This guide is the companion piece: not why the two are different, but exactly what is happening inside the chamber during each one, and the hands-on loading technique that determines whether a cycle that looks fine on the display actually did its job.
Both liquid loads and discard loads can complete a cycle, display “complete”, and still have failed part of the load — for entirely different physical reasons in each case. Understanding those reasons is what separates loading technique that happens to work from loading technique that reliably works.
Part One: Liquid and Media Cycles
Start with the vessels, not the autoclave
Consistency is the single biggest factor in a liquid load, and it starts before the bottles reach the chamber. Suitable bottles — Duran-type laboratory bottles are the standard choice — should be the same size and filled with similar volumes, for example around 300 mL each. Matching size and fill volume means every vessel heats at roughly the same rate.
The reason this matters is straightforward physics: a bottle that is much larger, or much fuller, than the rest of the load will lag behind thermally. It may still look fine when the cycle ends, but it can be under-processed even though the displayed cycle appears to have completed normally — because the autoclave’s control point was reading a different, faster-heating bottle.
Give the load room to breathe
Once bottles are in the chamber, spacing matters as much as bottle choice. Steam needs air gaps between vessels to circulate and to displace the air it is replacing — that circulation is what allows every part of the load to warm evenly. Tightly packed bottles, or bottles pressed against the chamber wall, block that circulation and can leave cooler pockets within the load, even in an otherwise well-run cycle.
- Leave visible gaps between bottles, not just between the load and the chamber wall.
- Avoid stacking bottles directly on top of one another unless the basket or rack is specifically designed for it.
- Keep bottle necks upright and closures loose or vented, never fully sealed, so pressure can equalise safely during the cycle.
The load probe: your one true reading of the product
Many autoclaves monitor liquid loads using a load probe — sometimes called a load sense timing probe, or LST probe (see Astell’s guide to what load sensed process timing is for how the feature itself works) — inserted into a representative vessel via a hole in the bottle lid. The bottle carrying the probe effectively becomes the control bottle for the whole load: its reading is what the autoclave uses to decide when sterilisation has actually started and for how long it needs to continue. That makes probe placement a decision with real consequences, not a routine step to rush through.
Where mixed loads go wrong
Mixing bottle sizes in a single load is one of the more common ways a liquid cycle goes quietly wrong. If small and large bottles run together and the probe sits in a small bottle, that bottle reaches sterilising temperature first and the autoclave starts timing the hold — while the larger bottles are still catching up. Those larger volumes can end up under-sterilised even though the cycle completed on schedule.
Move the probe to the largest bottle instead, and the reverse problem appears: the smaller bottles, which reached temperature earlier, sit at sterilising conditions for longer than necessary and become over-processed — a particular problem for temperature-sensitive media, which can caramelise or shift pH under excess heat. The reliable fix is to keep liquid loads as uniform in size and volume as possible and, where mixing genuinely cannot be avoided, to place the probe in the slowest-heating item in the load, never the fastest.
What actually happens during a liquid cycle
Understanding the stages of a liquid cycle explains why the details above matter as much as they do:
- Free-steaming. The cycle opens at around 100°C, driving air out of the chamber and giving the load’s temperature a head start on catching up with the chamber’s.
- Pressurisation and heating. Once free-steaming is complete, the valve closes and the autoclave raises pressure and temperature toward a sterilisation set point — typically 121°C for 15 minutes, though this varies by protocol and by how heat-sensitive the medium is.
- Overshoot and hold. Because liquid warms more slowly than the metal chamber around it, the controller may briefly push chamber temperature above the set point — up to roughly 123°C — to help the liquid catch up faster. Once the load probe confirms the liquid itself has reached target temperature, the controller settles the chamber just above the set point so the load stays at or above 121°C for the full sterilisation time.
- Cooling. Many systems cool naturally to just above 100°C before fans assist further. The load must not be opened until its own temperature — not just the chamber’s — has dropped below roughly 80°C. At that point, with heat-proof gloves and appropriate face protection, bottles can be removed safely.
Faster cooling needs its own safeguards
Cooling jackets or internal chamber fans speed up the final, often slowest, stage of a liquid cycle. Where these features are fitted, an air-ballasting system is also required to manage the resulting rapid drop in chamber pressure as the load cools. Without it, liquid inside sealed or partially sealed vessels can boil and bubble out under the reduced-pressure conditions created by fast cooling — turning a time-saving feature into a spillage risk. See Astell’s companion guide to the five ways an autoclave cools a load for how these components fit together.
A quick liquid-load troubleshooting checklist
- Cycle completed but results look inconsistent bottle-to-bottle? Check bottle size and fill volume uniformity first.
- Media boiling over on removal? Check whether an air ballast system is fitted and functioning if fast cooling is in use.
- Suspect under-processing in part of a load? Check where the load probe was positioned relative to the largest or slowest-heating vessel.
Part Two: Discard and Waste Cycles
Discard and waste loads have a reputation as the easy category of autoclave work — the material inside is being destroyed, not preserved, so it is tempting to run the autoclave on maximum settings and move on. That works, but it is rarely the most efficient method, and “it worked this time” is a low bar for a process whose entire purpose is making contaminated material safe to handle.
The real challenge with a discard load is structural rather than chemical: bags, gloves, tubing and Petri dishes create a complex geometry of interlocking shapes that trap pockets of air, and trapped air blocks the steam that sterilisation depends on.
Choosing and preparing the bag
Start with proper autoclave-compatible bags. The instinct to seal a waste bag tightly, the way you would a bin bag, works against you here — from an autoclaving perspective, the more open the bag, the better. Either leave the bag open, or loosely gather the top and secure it with autoclave tape in a way that still allows fingers into the opening. This lets air escape and steam enter freely rather than turning the bag into a sealed pocket of trapped, insulating air.
Containing the risk: the Morrison container
Waste bags should be placed inside a Morrison container, or a similar rigid autoclave basket with a waterproof lower section and a perforated central area. If a bag splits during the cycle — and with hot plastic and shifting loads, this does happen — the container catches spills and prevents contaminated material from reaching shelves, the chamber floor or the heating elements underneath. The perforations allow steam to reach the bottom and centre of the load rather than pooling liquid without letting steam through.
Slide the loaded container into the chamber with room around it for steam to circulate freely, and resist the urge to fit in one more bag than the space comfortably allows. Overcrowding is one of the most common ways a discard cycle underperforms: it reduces steam penetration and slows air removal across the whole load, not just the extra item.
Where the load probe does not belong
Unlike media cycles, discard cycles typically do not use the load probe inside the waste itself. Do not push the probe into the bag — the hot plastic can melt around it, making it difficult to remove and potentially damaging the probe. For discard cycles, the probe is usually tucked safely down the side of the Morrison container instead, and the controller monitors chamber conditions rather than trying to read a representative point inside an irregular, unpredictable load.
What happens during a discard cycle
Discard cycles are typically designed for items such as Petri dishes, gloves, tissues and general contaminated laboratory waste, and are commonly run at 121°C for at least 15–20 minutes.
- Free-steaming. The cycle begins around 95–100°C, allowing waste temperature to catch up with the chamber and, critically, helping to remove air from inside bags and around the load.
- Sterilising hold. The autoclave raises the chamber to around 121°C and holds it there for 15–20 minutes or longer, depending on protocol and load size — denser or bulkier waste can need considerably longer, and validated hold times should always take precedence over these general figures.
- Cooling. Because control is based on chamber temperature rather than a load probe, discard cycles often cool faster than media loads — cooling fans typically activate earlier, bringing the chamber and its contents down to a safe opening temperature sooner.
Where advanced features earn their keep
Autoclaves fitted with a vacuum system can significantly improve air removal on discard loads specifically, using pulsed vacuum to strip out trapped air more aggressively than free-steaming alone. This matters most where discard volumes are high or load geometry is particularly awkward — a bin of assorted plastics and gloves benefits far more from active air removal than a load of simple glassware ever would. See Astell’s companion guide on diagnosing and cutting autoclave cycle time for how air removal fits into the bigger picture of cycle efficiency.
Segregation and compliance considerations
Mixing bottled fluids into a discard bag, or attempting to process biohazard waste in the same load as routine general waste, works against the careful air-removal steps above and can create compliance problems that have nothing to do with the autoclave itself. Where a load contains higher-risk material, CAT III compliance options such as HEPA filtration become a prerequisite rather than an optional extra, and should be reflected in the equipment specification, not worked around at the loading stage.
A quick discard-load troubleshooting checklist
- Bags coming out only partially processed near the centre of the load? Check for overcrowding and bag sealing before assuming a cycle-time problem.
- Probe damaged or hard to remove after a cycle? Confirm it was placed beside the Morrison container, not inside the bag.
- Splits or leaks found after opening the chamber? Confirm a Morrison container, not an open basket, is being used for every discard cycle.